
Introduction
In this tutorial we will check how to use strings in our protobuf messages, using Nanopb and the Arduino core, running both on the ESP32 and on the ESP8266. Please check the previous tutorial for a detailed explanation on how to get started with Nanopb.
As can be seen here, when defining the message type in the .proto file, string is one of the data types we can use.
Nonetheless, when defining the message structure in the .proto file, we cannot specify the maximum length of the string. Although Nanopb can work with this scenario, the generated data structure after compiling the .proto file is more complex.
So, we will check how we can specify a maximum length for a string field, so the generated struct attribute will be a simple char array.
The tests on the ESP32 were performed using a DFRobot’s ESP-WROOM-32 device integrated in a ESP32 FireBeetle board. The tests on the ESP8266 were performed on a DFRobot’s ESP8266 FireBeetle board.
The .proto definition
We will define our message in a .proto file, like we did in the previous tutorial. After that, we will use the protoc compiler to generate the data structures that will be used by our code.
Please refer to that tutorial for a detailed explanation on how to use protoc to generate the data structures needed, since in this section we will only cover the definition of the message type.
So, we need to start out .proto file by specifying the syntax version we are using. We are going to use version 2.
syntax = "proto2";
Then, we are going to define the message type. We will name it StringMessage.
message StringMessage {
//body of message
}
We are going to start by declaring an integer field called integer, which we will set as required. We will assign to it the unique number 1.
required int32 integer = 1;
Then, we will declare a string field called message, which will be also set to required. We will assign to it the unique number 2.
required string message = 2;
The final .proto file can be seen below.
syntax = "proto2";

message StringMessage {
	required int32 integer = 1;
	required string message = 2;
}
We will call our file StringMessage.proto. Note that the name of the file will be the same name of the .h and the .c files that are generated after the protoc compilation.
But before we proceed with the compilation, we still need to specify the maximum length of our string field. To do it, we simply need to create a .options file with the same name as our .proto file. So, the file should be called StringMessage.options.
Inside that file, we simply need to specify the maximum size of our field, with the following syntax:
#messageName#.#fieldName# max_size:#maximumSize#
We will assume a maximum length of 128 characters. So, the file content should be:
StringMessage.message max_size:128
Note that the .options file should be located in the same folder where the .proto file is.
After finishing the content of both files, simply run the protoc compiler and you should obtain a StringMessage.pb.h file and a StringMessage.pb.c file. If you open the .h file, you should see the C struct representing the message we defined in our .proto.
As shown in figure 1 below, the struct contains both the integer and the string fields and, in the case of the string, it corresponds to a char array with a length of 128 characters, like we defined in our .options file.

Figure 1 – Generated header file after .protoc compilation.
In order to be able to import the generated fields in the Arduino code, navigate to the folder where the Arduino sketch we are going to write is located, create there a folder called src and paste the two files inside the created folder.
The code
We will start our code by the includes. The first thing we need to include is the .h file that was generated from the compilation of the .proto file, since it has the definition of the struct that represents the message type we have created.
As mentioned before, the .h and the .c files generated by the protoc should be in a src folder inside the Arduino sketch, so we need to consider that location in our include.
#include "src/StringMessage.pb.h"
Next, we need to Nanopb library includes, more precisely the pb_common.h, the pb.h and the pb_encode.h.
#include "pb_common.h"
#include "pb.h"
#include "pb_encode.h"
Moving on to the setup function, we will open a serial connection, so we can later output our serialized message.
Serial.begin(115200);
Then, we will need to declare a buffer that will hold the bytes of our serialized message. We will not worry about calculating the maximum length the message can have, so we will use a size of 200 bytes, which is more than enough to accommodate the message.
uint8_t buffer[200];
Next, we will declare the message data structure and initialize it with the define that is generated automatically by Nanopb when compiling the .proto file. This will allow to set the members of the structure to their default values without needing to worry about setting each individual value.
As covered in the previous tutorial, the syntax of the generated define is the following, where #MessageName# is the name we defined for our message type:
#MessageName#_init_zero
So, in our case, since our message type is named StringMessage, we have the following initialization:
StringMessage message = StringMessage_init_zero;
Next, we need to create the output stream for writing into our memory buffer. Recall from the previous tutorial that Nanopb uses the concept of streams to access data in encoded format.
So, we simply need to call the pb_ostream_from_buffer function, which receives as first input our memory buffer and as second the size of the memory buffer.
As output, this function returns a struct of type pb_ostream_t, which we will store in a variable.
pb_ostream_t stream = pb_ostream_from_buffer(buffer, sizeof(buffer));
Now we will set the values of the fields of the message. Recall from the .proto definition that we had a field called integer, which is an int, and a field called message, which is a string.
For the integer field, we will assign it the value 10. For the message field, we will set it to a “Hello World” string. We will use the strcpyfunction to copy the “Hello World” string to the message field, which is a char array.
message.integer = 10;
strcpy(message.message, "Hello World!");
Now that we have set all the fields of our message, we will encode it to the binary format using the pb_encode function. This function receives as first input the address of our pb_ostream_t structure, as second the auto-generated fields description array, and as third the address of our StringMessage struct.
Since this method returns a Boolean value indicating if the serialization process occurred successfully, we will use it for error checking.
bool status = pb_encode(&stream, StringMessage_fields, &message);

if (!status)
{
    Serial.println("Failed to encode");
    return;
}
To finalize, we will print the total number of bytes written, which can be obtained from the bytes_written field of the pb_ostream_tstructure. Followed by that, we will print the bytes of the serialized message in hexadecimal format.
Serial.println(stream.bytes_written);

for(int i = 0; i<stream.bytes_written; i++){
    Serial.printf("%02X",buffer[i]);
}
The final code can be seen below.
#include "src/StringMessage.pb.h"

#include "pb_common.h"
#include "pb.h"
#include "pb_encode.h"

void setup() {

  Serial.begin(115200);

  uint8_t buffer[200];

  StringMessage message = StringMessage_init_zero;

  pb_ostream_t stream = pb_ostream_from_buffer(buffer, sizeof(buffer));

  message.integer = 10;
  strcpy(message.message, "Hello World!");

  bool status = pb_encode(&stream, StringMessage_fields, &message);

  if (!status)
  {
      Serial.println("Failed to encode");
      return;
  }

  Serial.print("Message Length: ");
  Serial.println(stream.bytes_written);

  Serial.print("Message: ");

  for(int i = 0; i<stream.bytes_written; i++){
    Serial.printf("%02X",buffer[i]);
  }
}

void loop() {}
Testing the code
To test the code, simply compile it and upload it to your device. When the procedure finishes, open the Arduino IDE serial monitor. You should get an output similar to figure 2, which shows the message in hexadecimal format and the total number of bytes written.
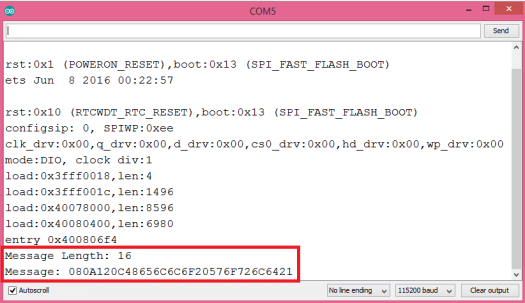
Figure 2 – Output of the program, showing the serialized message in hexadecimal format.
Next, simply copy the hexadecimal representation of the message and paste it in this online tool. After decoding it, you should get an output similar to figure 3, which shows the values of the two fields, which match the ones we have assigned in the Arduino code.

Figure 3 – Deconding the message using an online tool.