Introduction
In this tutorial, we will check how we can print numbers to the serial port using different bases, more specifically in binary, octal and hexadecimal.
The code we are going to see below will be very short and simple but this functionality is very useful since many times we want to print bytes or numbers in different bases, such as for example MAC addresses or hash message digests.
The tests on the ESP32 were performed using a DFRobot’s ESP-WROOM-32 device integrated in a ESP32 FireBeetle board. The tests on the ESP8266 were performed on a DFRobot’s ESP8266 FireBeetle board.
Nonetheless, the format specifiers we are going to use below are from the Arduino language (as can be seen here), so this tutorial should work on other Arduino compatible boards.
The code
We will write the full code in the Arduino setup, since it will be very simple. We will start by opening a serial connection. We do this by calling the begin method on the Serial extern variable.
This method receives as input the baud rate, which should later match the one we are going to use on the Arduino IDE serial monitor.
Serial.begin(115200);
We will now print the same number in different bases. In this example we will be using the number 10, but you can test with other values.
We will start by printing it in binary format. In this base, the value 10 is represented by 1010.
So, in order to print a number in binary, we simply need to call the print method on the Serial extern variable, passing as first input the number and as second the constant BIN.
Note that this also works if we use the println method, which simply adds a newline at the end. We are going to use this method instead so the different representations of the number 10 are printed across different lines.
.println(10, BIN);
Next we will print the number in hexadecimal. The number 10 in hexadecimal is represented as A.
So, we will call the exact same println method but this time we will pass the constant HEX as second argument, as can be seen below.
Serial.println(10, HEX);
To finalize, we will test this for another commonly used base which is octal. In this case, the number 10 is represented as 12.
We use again the println method of the Serial extern variable, passing as first input the value 10 and as second input the constant OCT.
Serial.println(10, OCT);
The full code can be seen below.
void setup() {

  Serial.begin(115200);

  Serial.println("-----------");
  Serial.println(10, BIN);
  Serial.println(10, HEX);
  Serial.println(10, OCT);
}

void loop() {}
Testing the code
To test the code simply compile it and upload it to your device. Then, when the procedure finishes, open the Arduino IDE serial monitor. You should get an output similar to figure 1, which shows the number 10 printed in the three different bases, with the expected values.
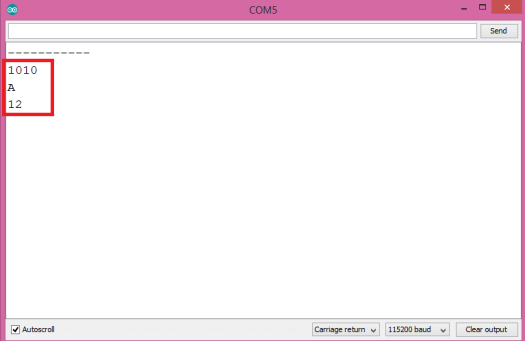
Figure 1 – Output of the program, showing the number 10 printed in the three different bases. Taken from the ESP8266 test.
Note however that this method doesn’t add leading characters in any representation. So, we cannot specify how many characters we want to use to represent our number. For example, we could want to represent each number as a full byte, so 10 would be 0A in hexadecimal, and with the approach we have used it will print A.
So, if we need something similar, then we can use the Serial object printf function and format specifiers.